Chapter 6
Running the show: cues, GO and Show Lock
Add cues, run them from the Live workspace, and lock the show for the performance.
Tracks, length and stops (timeline toolbar)
Everything below is in the Timeline toolbar of the Show workspace:
- Track (the menu showing 1 · Main): the timeline playing now. A show can hold several tracks (songs, scenes, acts), each with its own layers, cues and length. Open the menu to switch track, or choose New track, Duplicate this track, Rename this track… or Delete this track.
- Length: how long the current track lasts. Type or drag the value, or drag the end of the track (the handle at the end of the ruler).
- Cue: adds a cue at the playhead. Playback runs through it; GO and BACK jump between cues.
- Stop: adds a stop at the playhead (a cue with Hold on, shown in amber with a hand). Playback halts there until the next GO.
On the ruler, click a cue flag to edit it in the Inspector, drag it to move it, double-click to jump to it, and right-click to turn the stop on or off or delete it.
Cues
A cue is a named point on the timeline. GO jumps to the next cue and plays; BACK goes to the previous one.
Add a cue
- Move the playhead where the cue should be.
- Click + next to Cue list (in the Live workspace) or open the command palette (
Ctrl+K), type cue and pick Add · Cue at the playhead. - Select the cue to edit it in the Inspector.
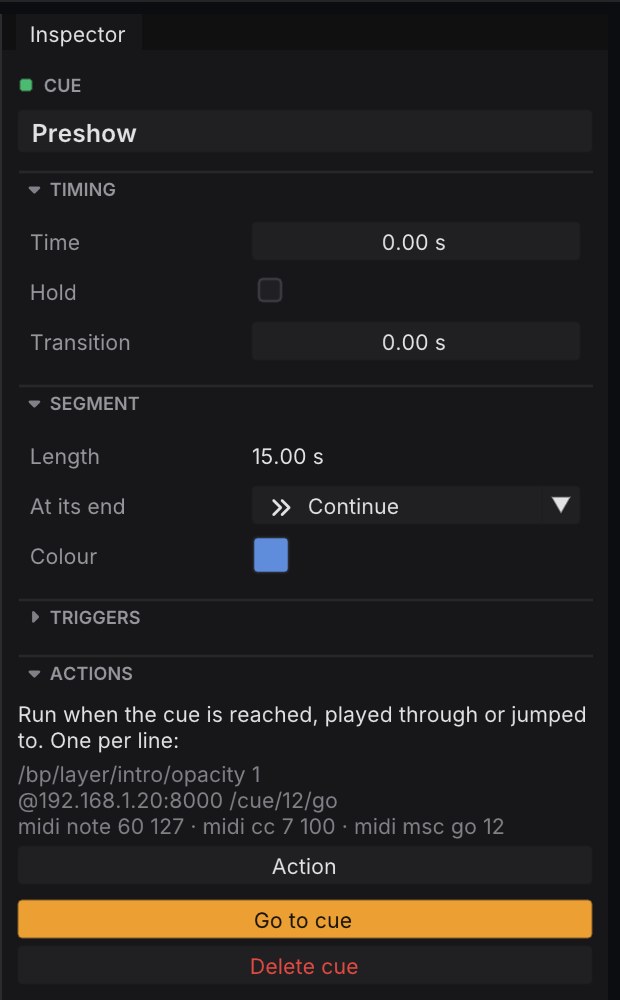
Cue settings
- Time: where the cue is. In the Cues panel, Set to playhead moves the selected cue to the playhead.
- Hold: playback stops at this cue until the next GO, for a speech or an applause.
- Transition (seconds): when you arrive with GO, BACK or a jump, the picture from before the jump dissolves into the new one with a smooth curve.
0is a cut. Playing through a cue never fades. The dissolve happens on the canvas, so every output, NDI and Syphon send gets it. - Actions: messages sent when the cue is reached, one per line (+ Action adds a line). A line that is not understood turns red with the reason:
| Line | What it does |
|---|---|
/bp/layer/intro/opacity 1 |
A control message for this show |
@192.168.1.20:8000 /cue/12/go |
OSC to another machine (sound desk, playback system…) |
midi note 60 127 · midi cc 7 100 · midi pc 5 |
MIDI note, control change, program change |
midi msc go 12 |
MIDI Show Control for the lighting desk |
Actions fire once each time the playhead plays through the cue or a jump lands on it; scrubbing backwards does not fire them. In a cluster only the main machine runs them, so the desk never receives GO twice.
The next cue is preloaded
PixelWright prepares the next cue before you press GO: its video layers are already decoded at the right frame, so the picture is there on the very first frame after GO. The GO button tells you when it is ready (✓ ready) or still preparing (preparing 2/4, in amber).
Triggers: timecode and MIDI notes
A cue can be reached from outside, in any track. Select the cue and open Triggers in the Inspector:
- Timecode: when this timecode arrives, the show jumps to the cue (switching to its track if needed) and follows the timecode from there, until a later trigger. Use the incoming timecode takes the TC arriving now. The Timecode panel must be in Preview or Live.
- MIDI note (with a channel, or Any; Learn takes the next key you press): a note-on jumps to the cue and plays. If several tracks use the same note, the playing track’s cue wins. MIDI input must be on (Control → MIDI); the Inspector offers a button when it is off.
In the Timecode panel, each timecode range can also pick a track, so a range plays a given song.
The Live workspace
Press Ctrl+4. Everything you need during the show is on one screen:
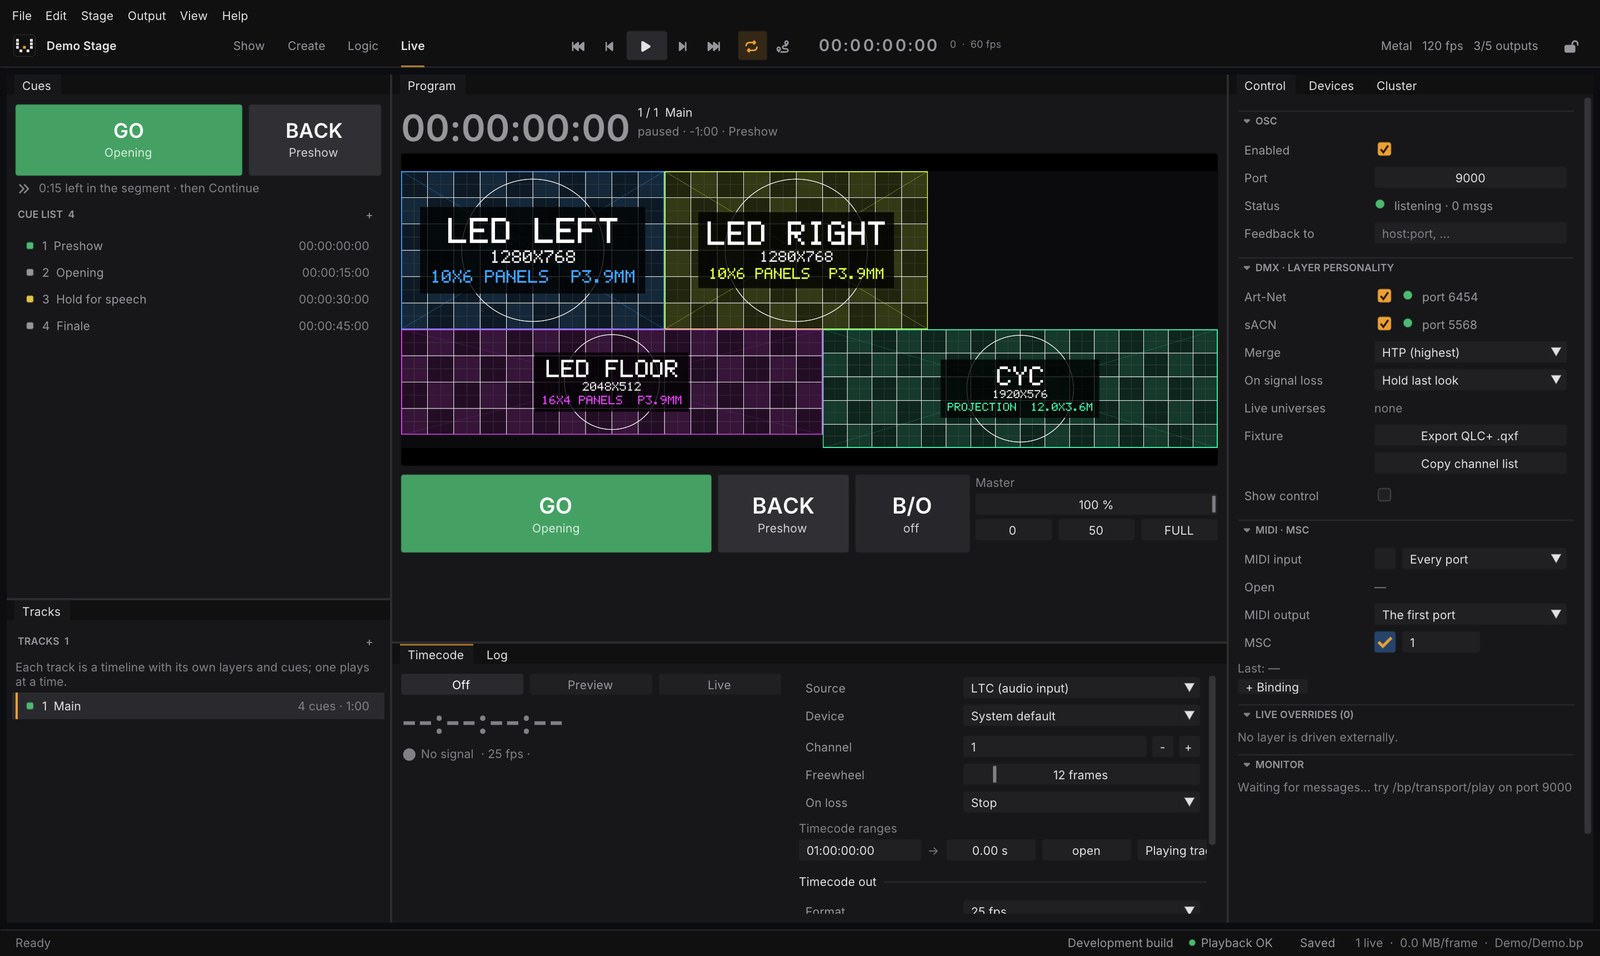
- Cues: big GO (with the name of the next cue) and BACK, and the cue list. Click a cue to select it; double-click it (or right-click → Go to cue) to jump there.
- Tracks: a show can have several timelines (a setlist). One plays at a time; switch tracks here, from the palette or by remote control.
- Program: the canvas as it goes out, the big timecode, the current track and cue, and the time left.
- GO, BACK, B/O (blackout) and the Master fader with 0, 50 and FULL shortcuts.
- Timecode and Log tabs below; Control, Devices and Cluster on the right.
From the keyboard: Enter is GO and Shift+Enter is BACK.
Show Lock
During the performance, Show Lock protects the show from accidental edits. Turn it on with the padlock in the top bar, Edit → Show Lock or Ctrl+Shift+L. A red LOCKED badge shows it is on.

- Still working: transport, cues (GO / BACK and cue actions), timecode, external control (OSC, DMX, MIDI, REST API, web remote) and saving.
- Read-only: stage and outputs, media and import (including dropped files), layers and timeline, inspector, Blocks and nodes, installation logic and pixel mapping, undo, redo, duplicate and delete.
To start the studio already locked: pixelwright-studio MyShow/MyShow.bp --lock.
On show machines use the render node,
pixelwright-node, which has no editing UI at all. See Show machines and clusters.